10. Advanced tables
Introduction (click any heading below to return here)
You already have learned to markup basic data tables, and learned about borders, cell spacing and cell padding as well. This lesson will introduce irregular tables with missing cells or odd layouts, describe alignment techniques, and prepare you to use tables for page layout.
Also remember that tables are rendered by a very smart browser. We supply only the barest of table parameters, and the browser figures out the majority of details by itself. While this is very convenient for basic tables, frustration builds when we cannot figure out how to markup a particular table to have it look like we want.
Remember that tables are row-centric.
Table alignment, width and height
Dynamic and fixed tables
Many sites are designed with three main column sections to their home page using a combination of dynamic and fixed attributes. The two outside columns typically would contain menus, lists, small images, and advertisements. The middle of the page is the principle content of the site. It is often far less structured content, such as paragraphs and headings.
Learn to use fixed cell widths with the pixel spacer to force the outside columns (table cells) to be a constant width. The middle section would be a table cell with no fixed width. Markup the width attribute of this cell as width="100%".
Source code for the combo table above.
<table border="1" cellpadding="10" width="100%" >
<tr><td width="100" valign="top" id="leftCell">
This cell, like the one at the far right,
needs to have a constant width of 100 pixels*.
... etc
are typical on pages larger than these you are reading)
<img src="images/pixel.gif" alt="" width="100" height="1" />
</td><td width="100%" valign="top" id="middleCell">
<div style="font-size:14pt">
Fixed and dynamic table layout</div><br />
Paragraphs and lists that can wrap acceptably
... etc
</td><td width="100" valign="top" id="rightCell">
This cell, like the one at the far left,
needs to have a constant width of 100 pixels*.
... etc
are typical on pages larger than these you are reading)
<img src="images/pixel.gif" alt="" width="100" height="1" />
</td></tr></table>
<table align="left | right | center" ...>
Align left is the default, or automatic value for horizontal alignment.
Tables are aligned to the left, right or center of their parent container. Usually the parent is the <body></body>, but you can have tables within tables, and tables within <div></div> containers. This is an important point. Become aware of the containers of your tables.
For example, if a table is centered in a div that is right-justified, then the centered table will not appear to be centered on the entire page. While this usually happens on purpose, students should become aware of context so they know how to deal with this new parental influence.
There is no vertical alignment. If you want to raise or lower a table from its normally rendered position, you have a few options. Styling the table and using absolute or relative positioning is the most control you can have, but reducing the top margin to a negative number is simpler. Both methods are discussed later.
Align and height have been subsumed in CSS and will be deprecated in future versions of HTML. But you may learn table markup easier by not using CSS now. After your learning phase, remember to place both these tags in style sheets or inline with style="text-align:right; height:100px".Become aware of alignment reference. Placing align="left" in a <table> tag is very different from placing align="left" in a <td> tag.
|
<table width="? px | ? %" ...>
Width can be specified as a percent of the parental container width. If the parent is <body></body> then the table will widen and narrow as the browser window is widened and narrowed. This may be acceptable design, or you may wish to avoid a jelly table effect (most pronounced when table alignment is centered) by using fixed widths.
Width can be specified as pixels. There are typically 72 pixels per inch on screens, so width="200px" results in a table just short of three inches wide. When you append "px" instead of "%" to the width you produce fixed width tables.
Width can be omitted from the attributes list. If you do not specify width, one will be calculated for the table -- as narrow as possible without having to wrap lines of text. Thus the automatic width depends on how much data you are placing in the cells.
<td height="? px | ? %" ...>
Height can be specified as a percent of the parental container height. If the parent is <body></body> then the table will shrink and grow as the browser window is changed in height. This may be acceptable design, or you may wish to avoid a jelly table effect by using fixed heights.
Height also can be specified as pixels. There are typically 72 pixels per inch on screens, so height="300px" results in a cell just a bit taller than four inches. When you append "px" instead of "%" to the height you produce fixed height cells.
Height can be omitted from the attributes list. If you do not specify it, one will be calculated for the table just as you learned for width. Thus the automatic height depends on how much data you are placing in the cells.
Checkpoint (answer then click)
Tables can be aligned on the screen and controlled in width and height dimensions. Name the relevant attributes, and the acceptable format for their values, that control these properties. Click the check point to confirm your answers.
Alignment, width and height of cells
Table cells can be formatted in a variety of ways. Because there are no rules for which elements you should use for cell formatting (alignment, width and height), your options will be summarized here at one time. Don't be confused because there are so many ways to format cells. Choose the element that is easiest.
Cell attributes (tr, td, th, colgroup, col)
If you have a column of cells in the same format, choose the colgroup or col elements to specify format attributes. Or if you want to waste time, format each td element in the column one by one.
Similarly, if you have a row of cells all with the same format, specify formatting for the tr element, and the cells on that row will inherit the format.
Parent elements
Width and height will be influenced by parent elements, as you read earlier. Our topic is now cells, so the immediate parents are row and table elements. This is mentioned again because students get confused when their attribute markup has no effect whatsoever. Read the note at the right.
If you markup a table with width of 100px and markup a cell in the table with width of 300px, then the cell width attribute is ignored. Likewise, cell height will be ignored if you markup an impossible vertical format. |
Cell attributes reference
The standard attributes for table elements are: id, class, title, and style. These are not described in the table below.
| Attributes | Values | Description |
|---|---|---|
align |
right left center justify |
Horizontal alignment of cell contents Using style="text-align:?" is preferred to using this attribute |
valign |
top middle bottom baseline |
Vertical alignment of cell contents |
width |
pixels % |
Width of cell |
height |
pixels % |
Height of cell Using style="height:?" is preferred to using this attribute |
colspan(not colgroup or col) |
number | Number of columns this cell covers. If the value is "0", this column will span from this column to the last column in the table |
rowspan(not colgroup or col) |
number | Number of rows this cell covers. If the value is "0", this row will span from this row to the last row in the table |
span(colgroup or col) |
number | The number of columns that the col/column-group should span |
Checkpoint (answer then click)
Cell contents can be aligned. Name the attributes used for both alignment dimensions, and name the possible values of these attributes. Click the check point to confirm your answers.
Missing table cells
A regular, symmetric table has the same number of td containers for every tr container, in other words, the same number of cells on each row. You would expect this structure for data tables. But tables you use for complex data, or for page layout, will probably not be regular and symmetric.
Prepare to markup a table like one at the lower left by counting the number of rows, whether partial rows or complete rows. Then markup the table skeleton with that number of tr containers.
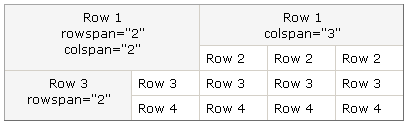
Design goal |
Row analysis |
<td rowspan=" ? "
This attribute is applied to th and td elements to tell the browser to render the particular th or td cell differently. Cells can be made to span across rows or columns to create the appearance of missing cells. Here, we will learn about spanning rows.
Solution to missing cells
Look above again. We needed to have one cell span three rows. Drawing a symmetric table with imaginary lines for the missing cells makes the three rows apparent. Using the table skeleton with three tr containers, markup the first cell as usual, but add code for rowspan="3".
Design goal
| row 1 rowspan='3' |
row 1 |
| row 2 | |
| row 3 |
Source code
<table  border='1' width='200px'
        cellspacing='0' cellpadding='8'>
    <tr><td rowspan='3'
            align='center'>
            row 1<br />rowspan='3'</td>
        <td>row 1</td></tr>
    <tr><td>row 2</td></tr>
    <tr><td>row 3</td></tr>
</table>
You may think rowspan="2" but always count the cell you are working with as the first part of the span.
Colspan
Just as cells can span rows, they can also span columns. Columns may be easier to visualize, and since the rules for counting the span is the same, you are pretty well prepared to learn this attribute and begin using it for your tables.
Review exercises
Here are a few tables for practice. Try not to look at the source until you have tried forming the table. Think of other asymmetrical shapes and code them as well. The benefit of working the exercises is gaining skill by practicing.
Click on a table to show/hide hints.
|
|
|
| |||||||||
| |||||||||||||
Advanced table exercises
Hints are built into the table below. Write the markup on paper and try it out on the browser.
Tryout (change the markup then click the button)
In this tryout remove the cells below that will create the table in the exercise above. You will need to use colspan and rowspan in certain of the remaining cells in order to indicate to the browser where to account for the cells you have removed.
More advanced table exercises

Nested tables
Recall we stated that just about any HTML elements can be included in the <td></td> and <th></th> containers. This included lists, paragraphs, images, and even other tables.
Table nesting is very common and can solve the trickiest of spacing and layout problems that rowspan and colspan cannot begin to provide enough help for. After you become comfortable with nesting tables, no layout is too daunting for you.
Also recall that we recommended using border="1" until markup is debugged and you are satisfied with the table's visible structure before making it invisible.
|
For nested tables always code the inner-most tables and debug them completely before marking up the surrounding table. Follow the visible border rule here, too. |
Get out some scratch paper and try to markup the table below.
Checkpoint (answer then click)
| Is there a nested table? | ||||||
|---|---|---|---|---|---|---|
| row 1 |
| |||||
| row 2 | ||||||
Table styles
Okay, so the nested table markup did require advanced stylesheet techniques to achieve the inside table borders, and you haven't learned about that yet. These pages are intended to prepare you for table styling when we cover it later.
If dynamic changes are intended for the height and width, the original values should be set through style (for example, style="height:200px; width:200px") rather than through the height and width attributes. Dynamic styling is covered under Javascript: Dynamic HTML.
Study tips for Tables.
|